-
Credit Repair Marketplace
-
Explore our extensive credit repair marketplace.
-
- Guaranteed Results
- Credit Insights
- For You?
Introduction
The following document includes details on specific Credzu platform functions and walkthroughs. The purpose of this document is to help service providers quickly find answers to basic functionality questions.
Companies who need help beyond the content provided in this document can reach out directly to the following Credzu representatives:
Cory Miller
Director of Strategic Partnerships
Cory@Credzu.com
Terminology
The following terms will be used frequently throughout this document:
Agreement/Offer – These terms are used interchangeably and refer to the contract a Service Provider presents to their client/consumer.
Client/Consumer – These terms are used interchangeably and refer to individuals seeking or receiving credit services from companies who provide them.
Dashboard – The Dashboard is where Service Providers and Partners can locate all clients that they have added or have been assigned to them.
Escrow Agent – An Escrow Agent is a representative of Credzu tasked with monitoring transactions, connecting consumers with service providers, setting up escrow payment arrangements with consumers, verifying performed services and approving service provider disbursement requests, and acting as a liaison between all parties involved in transactions.
Partner – A Partner is an individual who is referring their client(s) to service providers inside of Credzu. Partners are typically real estate agents, mortgage lenders/loan originators, auto dealers, insurance agents, etc.
Service Provider – Service Providers are companies who provide credit services to consumers.
Staff Members – Staff Members are typically employees or contractors of Service Providers, tasked with certain operations, such as sales, customer service, credit service operators, etc.
Tagging – Tagging refers to identifying a specific user in Credzu to which you would like to send something to, such as a chat message, document, or a request.
Timeline – Every Consumer will have their own Timeline, where all communication occurs and all operations unique to that individual are located, such as agreements, documents, escrow accounts, etc.
Operating Instructions
Logging in and out of Credzu
The Credzu login process is designed to prevent users from having to remember and change passwords and it also contains extra security measures by issuing short but temporary passwords sent via text message.
Dashboard
The dashboard is where service providers can locate and manage all of their consumers, partners, and staff members. It includes grouping features, a search function, and sorting features, explained below.
Navigating
The navigation menu on the Dashboard allows you to filter by user type (eg. consumer, staff member, etc) and Group. You can expand the list to 10-100 names and can also search for specific names, email addresses, or phone numbers.
Bell Notifications
The bell notification will show recent activity such as when you have been tagged in a message or when a consumer has signed an agreement. It operates the same way that many familiar social media platforms operate, showing the number of recent activities. When you click on it, it will show specific activities that you can click on and navigate to. Keep in mind that once you click on an activity, it will disappear from the bell notification. In addition to the bell notifications, the system will also send email and SMS notifications as well, depending on the activity.
Groups
Groups are designed to help service providers and staff organize their users for easy management. Here is key that defines each group:
New – This group contains users who just signed up but have not yet engaged with the system or company.
Engaging – This is a consumer who is interacting by sending messages, uploading documents, or completing other tasks such as adding their billing information, but who has not yet signed an agreement.
Contracted – Consumers are put into this group when they have signed an agreement but have not yet funded their escrow account.
Progressing – Once a consumer has signed an agreement and begun funding their escrow account, they are added to this group.
Completed – Consumers are put into this group when they have reached the end of their agreement.
Inactive – If consumers do not sign an agreement and do not interact with the system or anyone in the timeline for 5 days, they will be added to the Inactive group. Also, consumers who sign an agreement but ignore their first escrow payment request for 5 days will be added to this group.
Paused – Consumers who do not sign an agreement and request that they no longer receive any communication, will be added to the Paused group.
Exigent – Exigent means “pressing” or “demanding”. Users are added to this group when they have activity that the assigned service provider or staff should see, such as new messages, signed agreements, uploaded documents, etc. This activity might not require a response, but is important to see so you can stay up-to-date on what is going on. Once you view users in the exigent group, they will be moved back to another group, depending on their situation. The purpose of this group is to easily see all consumers who have recent activity. We recommend regularly sorting consumers by Exigent so you can stay up-to-date on what is going on in their timelines.
Canceled – Users are only put into the canceled group when they have specifically requested to cancel their services or have stopped funding their escrow account and communicating indefinitely.
Adding Users
Service Providers can add consumers, partners, and staff members by going to “MY ACCOUNT” in the right hand corner of the screen and then “ADD USER”.
Adding Consumers
While Service Providers may add consumers manually, it should never be done if the Service Provider has spoken with the consumer over the phone first.
Once a consumer has been added manually, they will receive a welcome email and can log into Credzu with the cell phone number provided upon account creation.
Adding Partners
By creating Partner accounts, Service Providers can allow their referral sources to add their clients to Credzu in order to be directly connected with the Service Provider. This will also allow the partner to view their clients’ timelines and see all interactions between the client and the service provider, as well as interact in the timeline through chat messages. Lastly, Partners will receive notifications updating them on their clients progress.
Adding Staff Members
Service Providers can add staff members to handle incoming clients. When they do this, they will be able toggle the staff member on and off in the dashboard. If the staff member is toggled on, new clients will be assigned to them (but still viewable to the main service provider account). They will receive all notifications for those specific clients and while the main service provider account will be able to view activity in the timeline for those clients, the account owner will not receive the notifications specific to them. If there are multiple staff members, the system will take turns equally assigning new clients to them. If the staff member is toggled off, they will no longer receive new clients but will continue to receive notifications for their current clients.
NOTE: If you need to delete a staff account and/or reassign clients linked to that staff member, please notify your Credzu rep immediately.
NOTE: Please make sure that staff members complete their profile before toggling them on to receive new clients.
My Progress
The “MY PROGRESS” option is located in the “MY ACCOUNT” menu located at the top right hand corner of every screen in Credzu. This page will show all complete and incomplete tasks including the Credzu Services Agreement (labeled “Sign Agreement” in the checklist), a link to complete the profile (labeled “Complete Your Profile”), and a link to add a bank account (labeled “Add bank into which payments are deposited”.)
Service Agreement
The Services Agreement is the agreement between the Service Provider and Credzu. It contains the Credzu Terms of Service, Terms of Use, Privacy Agreement, User Agreement, Fees Agreement, and Escrow Instructions. Each agreement can be viewed by clicking on the Services Agreement and then navigating to the specific link within that agreement. Once signed, the agreement will be placed in your files (labeled “MY FILES” in the “MY ACCOUNT” dropdown menu), where you can view and download it at any time.
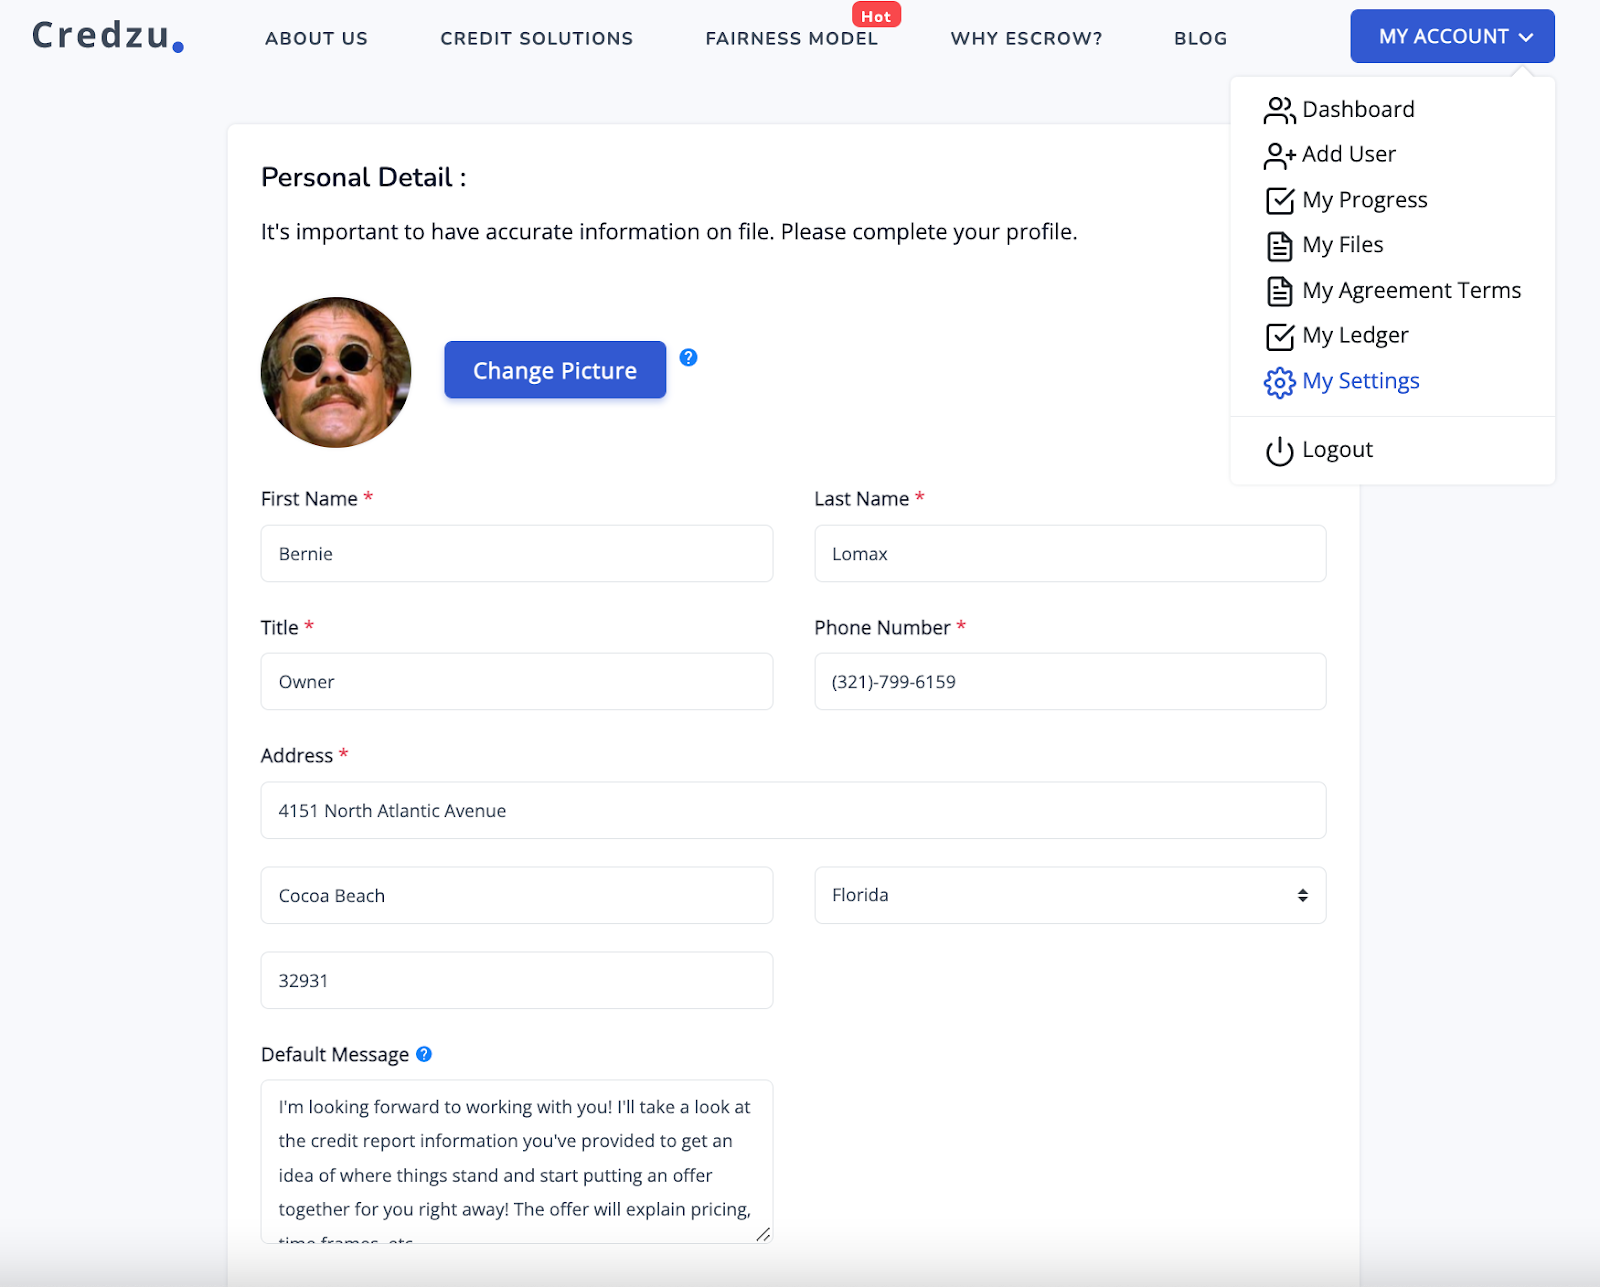
Complete Your Profile
The Complete Your Profile option in the My Progress page will take you to your settings page, where you can add/change your name, address, email, phone, billing address, etc.
Adding/Changing Banking Information
The “Add Bank Into Which Payments Are Deposited” option in the “MY PROGRESS” Page will allow you to add or change your billing information. Once you click on the link, it will begin to walk you through linking up your account.
BILLING NOTE: The information located in your profile (MY ACCOUNT>MY SETTINGS) must match the information your bank has on file for you including the name of the account holder, address, etc. If you add a bank account that doesn’t line up with the information you have included in your profile, you will receive an error.
My Files
The section labeled “MY FILES”, located in the “MY ACCOUNT” dropdown menu, contains your Credzu Services Agreement and any other important, company related documents that you choose to upload directly into this folder. This folder does not contain client related documents.
My Agreement Terms
The section labeled “MY AGREEMENT TERMS”, located in the “MY ACCOUNT” dropdown menu, contains your default client agreement. Each time that you create a new agreement (or “offer”) for a consumer, it will start with the information that you set up in your default agreement. You can make one-time changes to this information on a client-by-client basis. We suggest that before taking new clients in Credzu, you create a default agreement. This can save you time as you try to quickly engage your clients.
NOTE: The address listed in your “Company Profile”, located in the My Settings section, will be the address displayed in your agreements. To change this, you can go to the “MY ACCOUNT” dropdown menu and then choose “MY SETTINGS.”
My Ledger
The section labeled “MY LEDGER”, located in the “MY ACCOUNT” dropdown menu, contains a record of all payments requested, pending, approved, and cleared for each client.
By default the ledger will list the oldest payment to the newest payment, but you can sort by date range and search by name.
This function also contains a feature that will allow you export the data to a CSV. file that you can view in Excel and use for accounting purposes.
My Settings
The section labeled “MY SETTINGS”, located in the “MY ACCOUNT” dropdown menu, contains your account profile, billing profile, and direct signup page information.
Adding or Changing Profile Information
The profile name, title, and company name is visible to clients in their Timeline. We recommend that service providers taking on new clients keep this information up-to-date. You can change this information by going to the “MY ACCOUNT” dropdown menu and then choosing “MY SETTINGS.” This section also includes the ability to change the profile image that appears in each client’s timeline assigned to the service provider.
Adding or Changing Company/Billing Profile
It’s important to make sure that the name in the profile and the company profile information matches the information that the bank account linked has on file. You can change this information by going to the “MY ACCOUNT” dropdown menu and then choosing “MY SETTINGS.”
NOTE: The Company Profile information will also appear in each client agreement, so it’s important to keep it up-to-date.
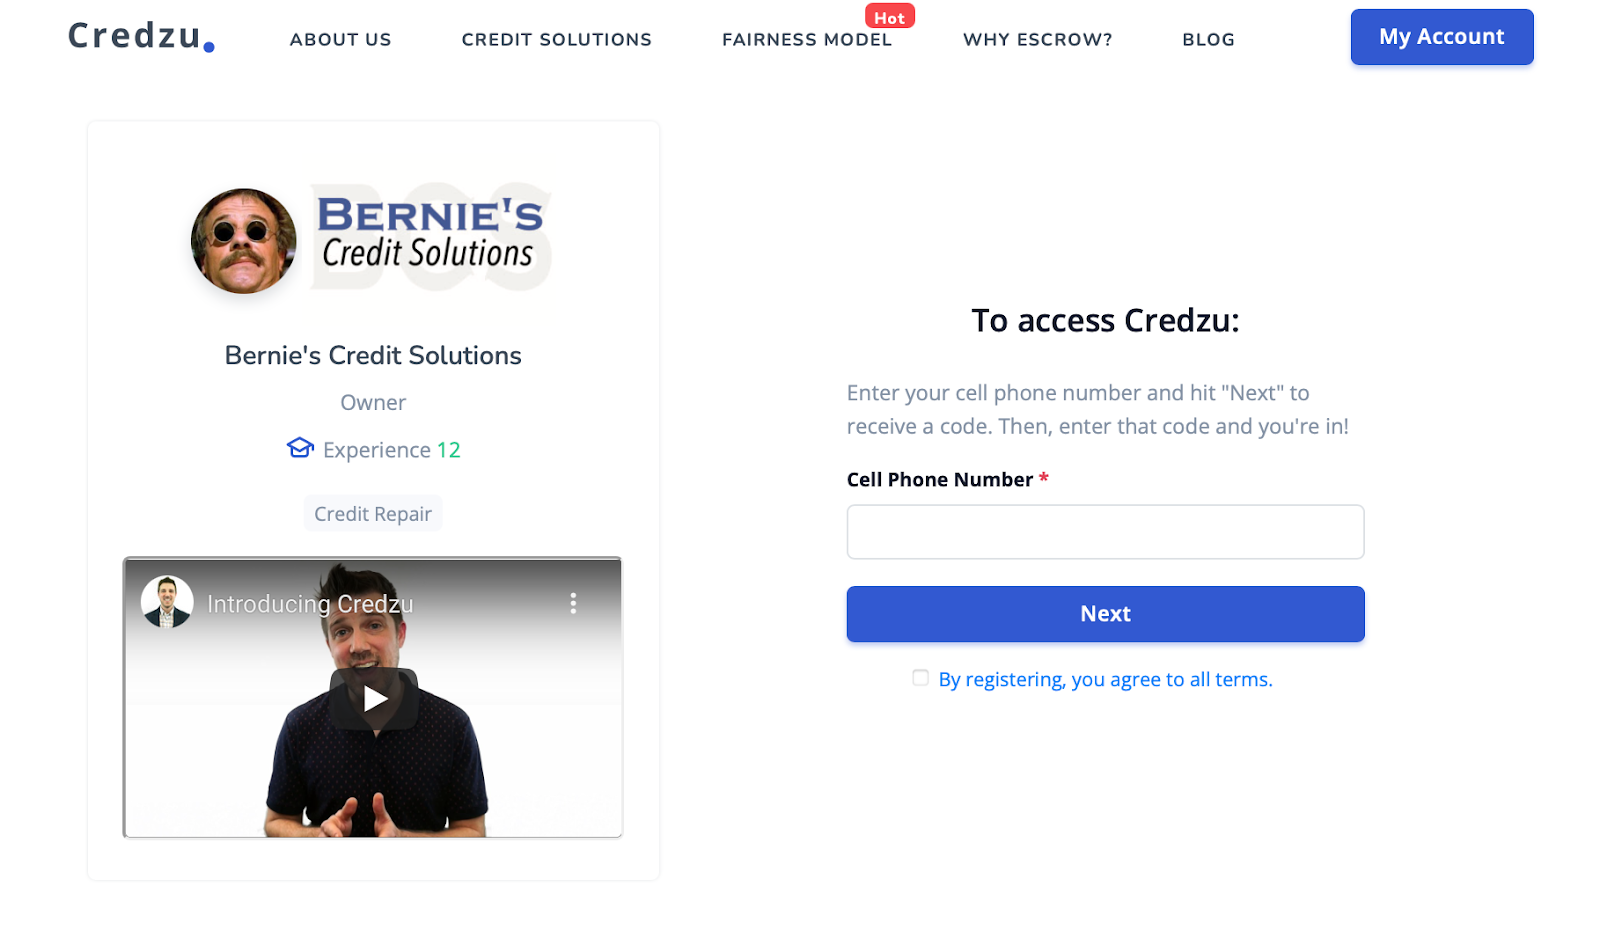
Direct Signups
The “Direct Signups” information is located at the bottom of the “MY SETTINGS” page.
This teal colored section includes the Service Provider Custom Signup link that can be used for new consumer’s signing up through your website or social media sites and the option to upload a logo and video.
Adding a video is a good way to further explain the process to your clients and what they can expect in regard to signing up, communicating, signing your agreement, and securing their payments in escrow.
Managing Partners
Partner accounts allow your referral sources to add clients to be connected with you. Partners will have access to their clients’ timelines and can view all interactions as well as receive automated updates as their clients progress and once they’re finished up. Their clients will receive reminders to reconnect with the partners once services are completed as well.
You can view your partners on your dashboard. When you click on their name, it will bring up a list of the client’s they have added.
NOTE: You will notice the partner’s name in each of their clients timelines and you can tag them in chat messages, if necessary.
Managing Staff Accounts
Many Service Providers have staff members that they put in charge of interacting with clients. When a staff member is assigned to a consumer in Credzu, they will receive all notifications and communication for that individual.
You can view all of your staff members on your Dashboard. You will have the option to toggle them on and off. If the staff member is toggled on, new clients will be assigned to them (but still viewable to the main service provider account). They will receive all notifications for those specific clients and while the main service provider account will be able to view activity in the timeline for those clients, the account owner will not receive the notifications specific to them. If there are multiple staff members, the system will take turns equally assigning new clients to them. If the staff member is toggled off, they will no longer receive new clients but will continue to receive notifications for their current clients.
NOTE: If you need to delete a staff account and/or reassign clients linked to that staff member, please notify your Credzu rep immediately.
NOTE: Please make sure that staff members complete their profile before toggling them on to receive new clients.
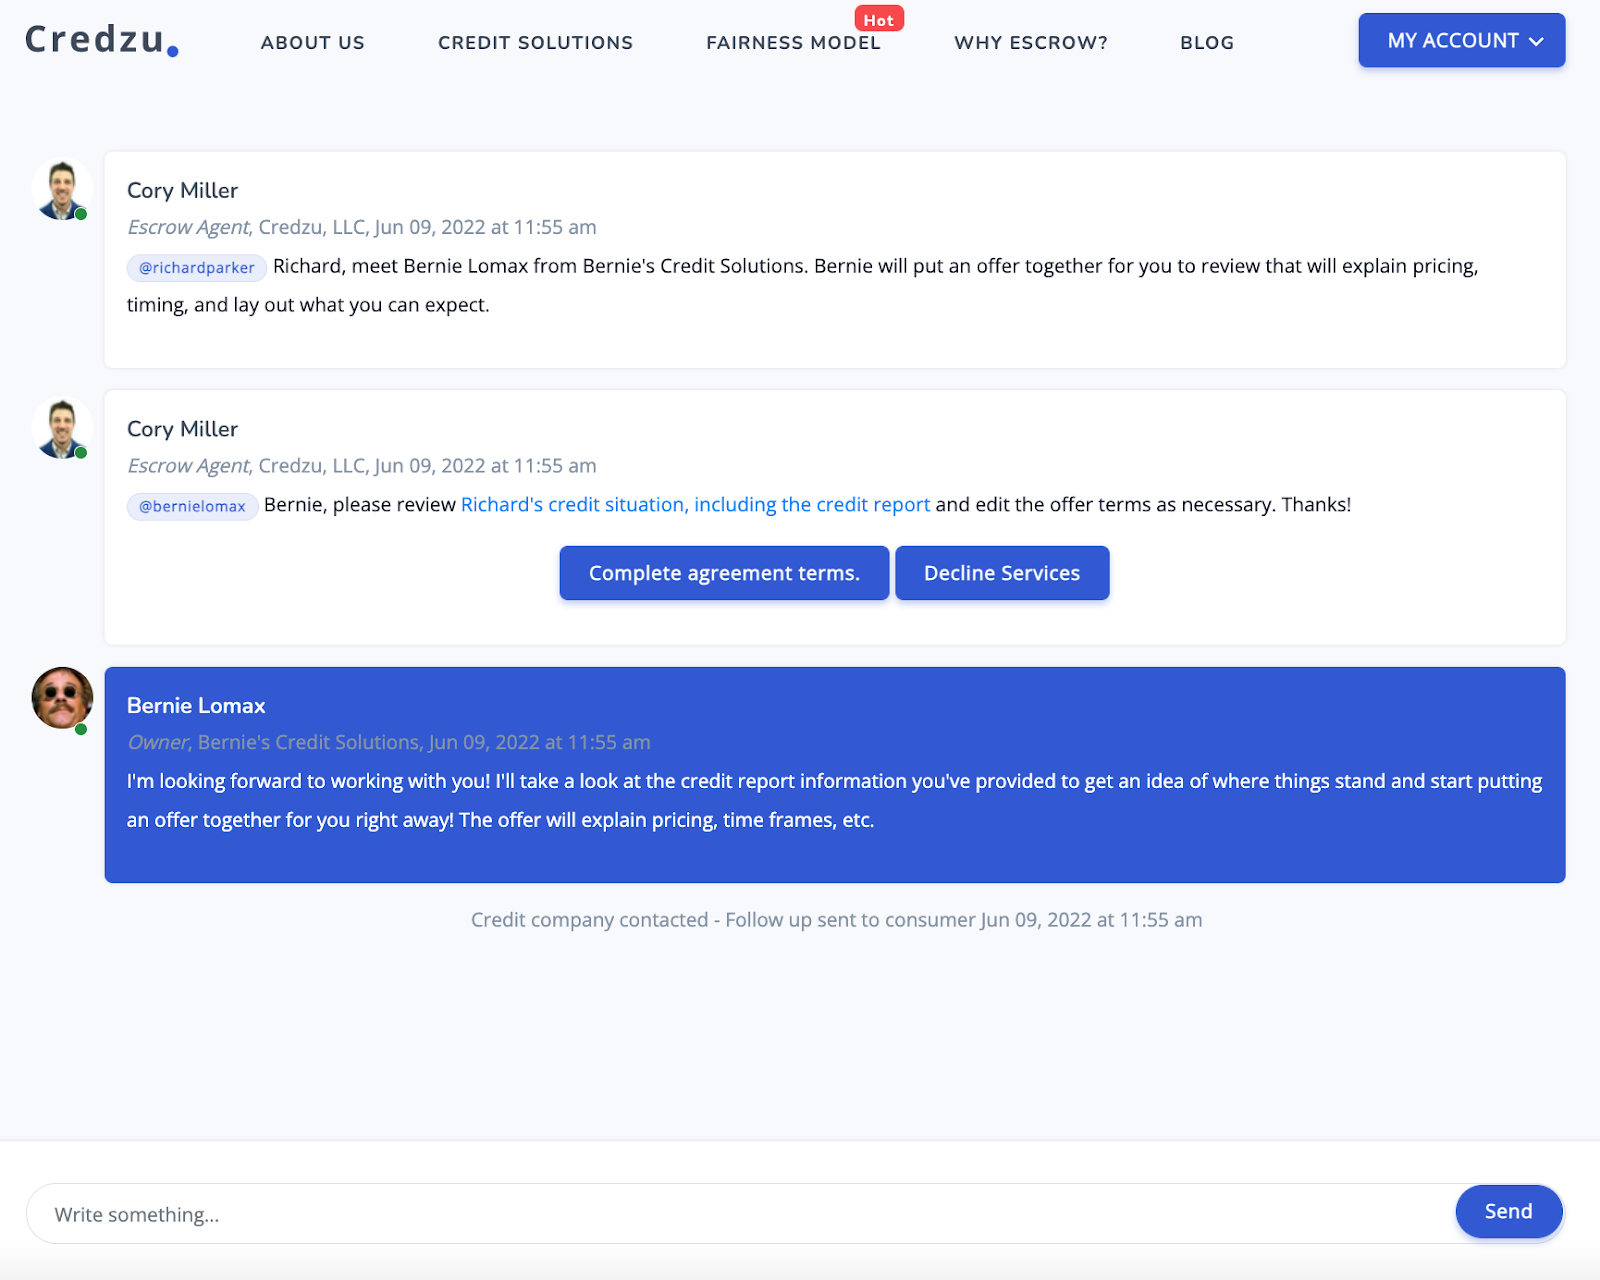
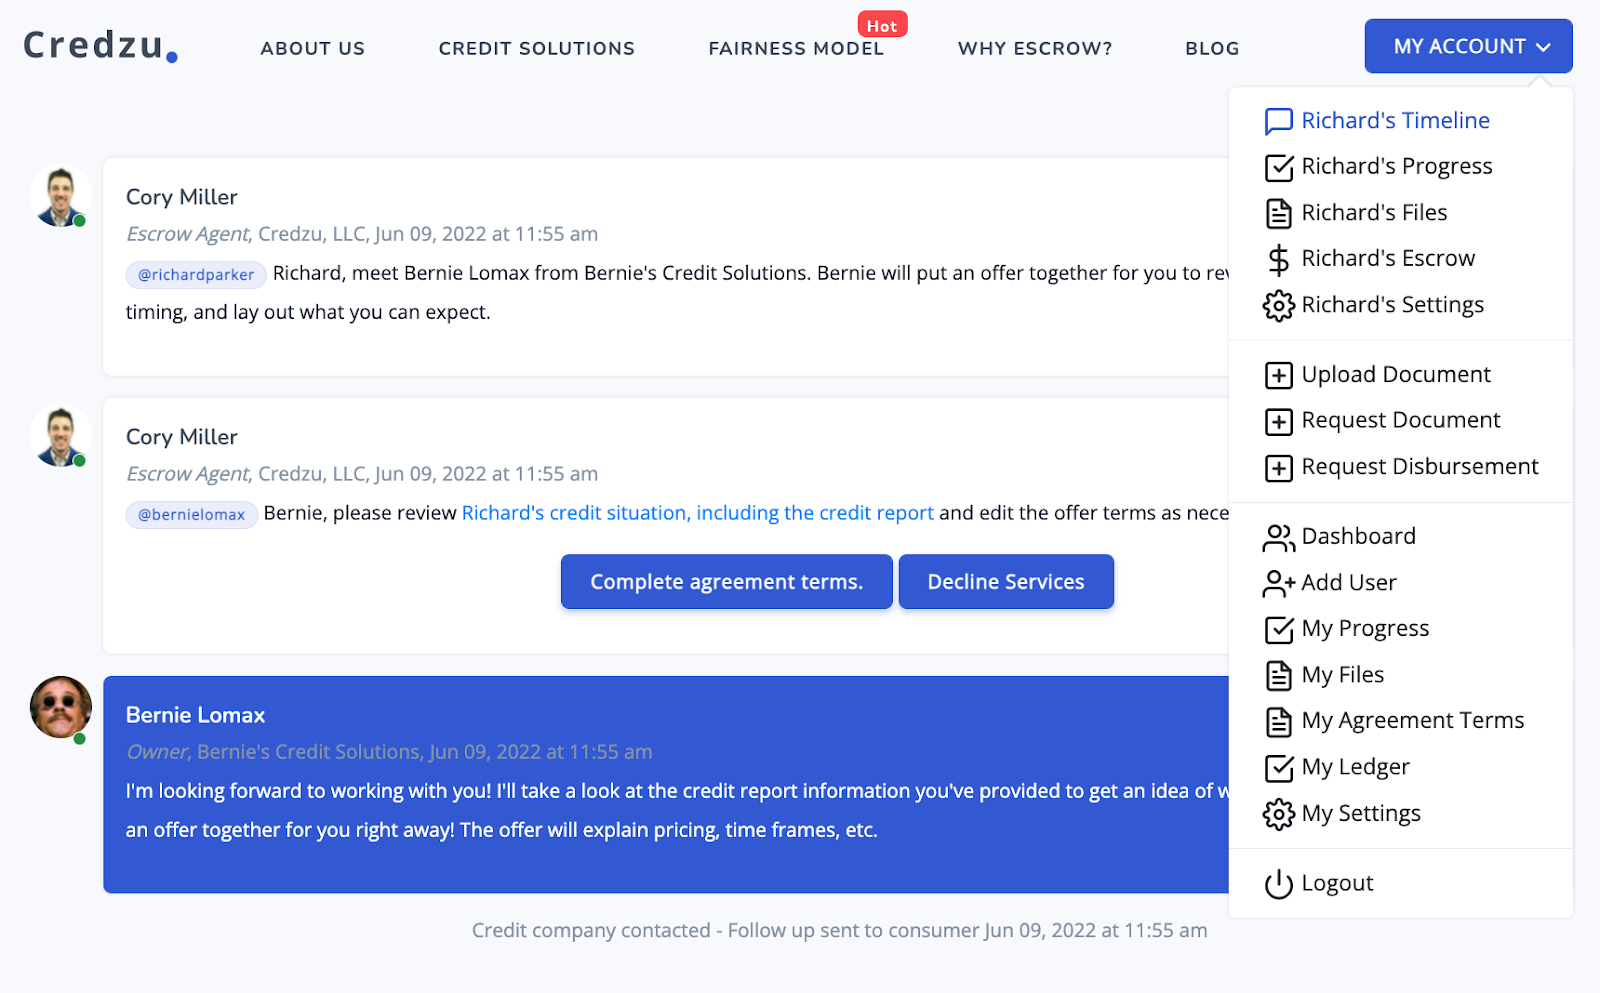
Timeline
The Credzu Timeline is where all communication for a specific consumer occurs and all operations unique to that individual are located, such as agreements, documents, escrow accounts, etc. All parties, including the consumer, service provider, escrow agent, partner, staff member, etc. can view all communication. Keep in mind that the Partner will not be able to view sensitive documents such as IDs.
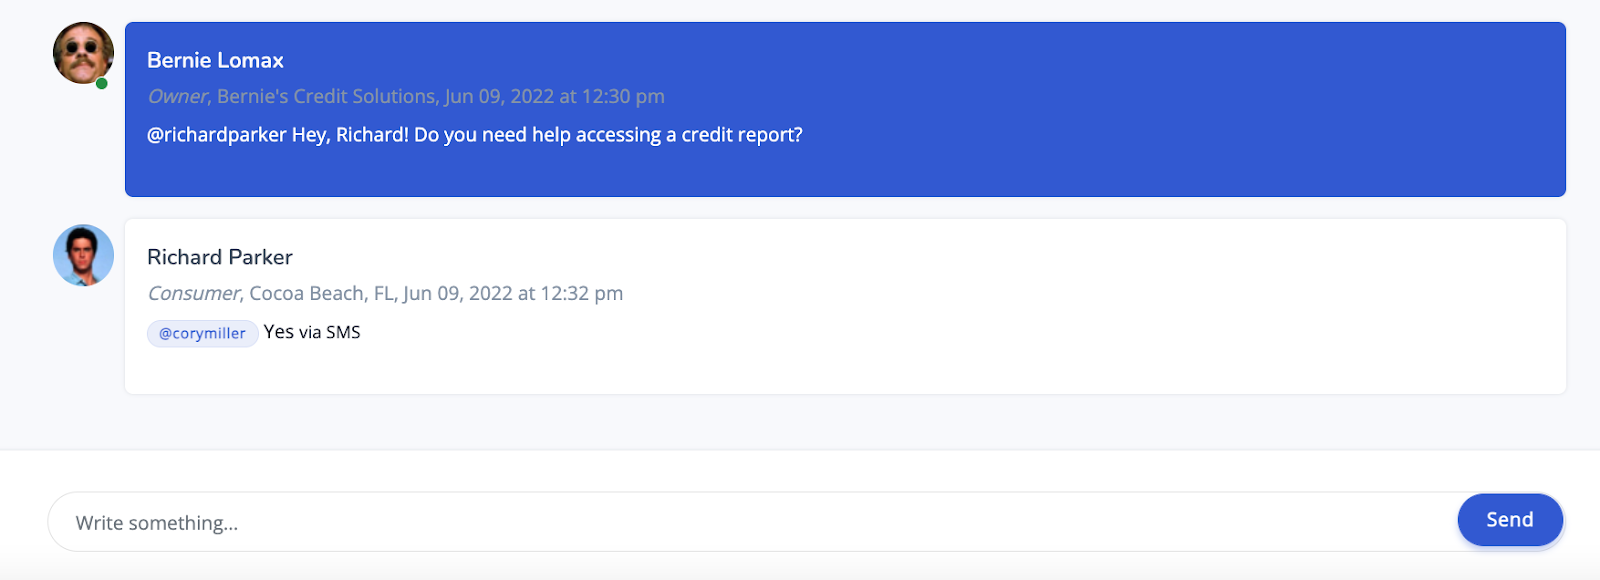
Using Chat
When a user clicks inside the chat box (labeled “Write something…”), they will be prompted to identify who they are sending the message to. They can choose multiple parties.
If a user has their screen minimized, they’re on a different browser tab, or logged out, they will receive a notification via email and text message, letting them know that someone in Credzu sent a message directed to them. The text messages and emails sent to consumers will show the wording of the message sent to them and they can respond directly through text, email, or Credzu chat.
Here is an example of what the consumer will see via text message notification:
Here is how the consumer response would look inside of Credzu to the Service Provider:
NOTE: A green dot next to the user’s profile picture indicates that the user is logged into Credzu and active in the system.
Adding Videos and Links in Chat Messages
Users can add usable links to websites and can also embed videos inside the chat by adding a Youtube link.
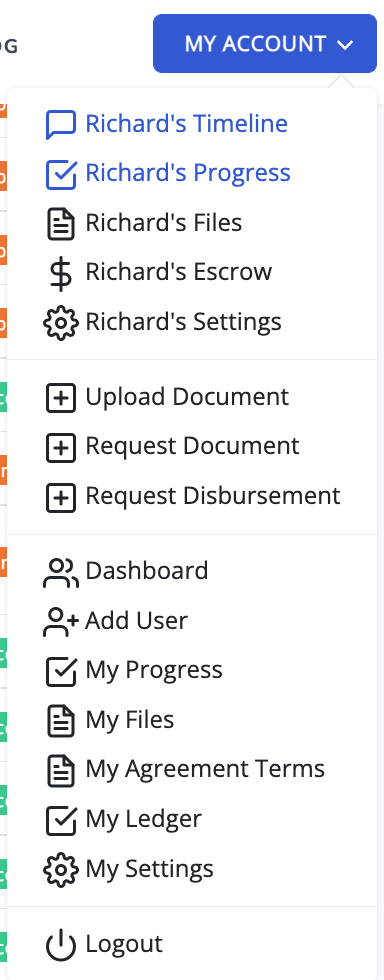
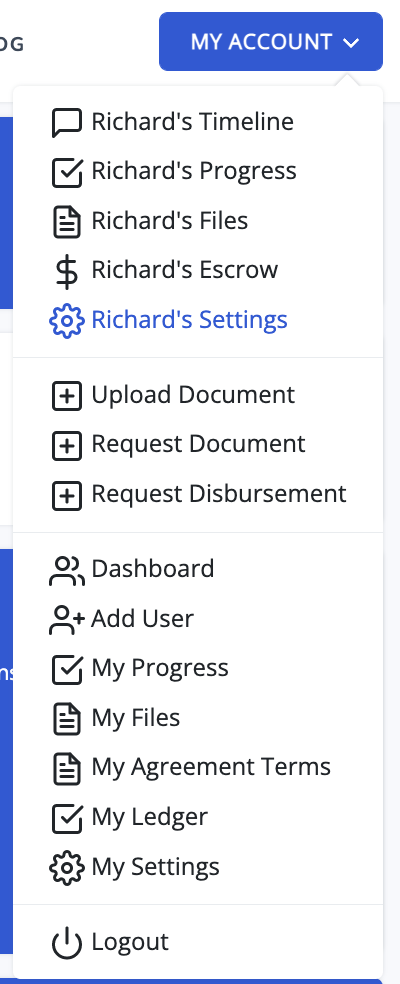
Timeline Menu
You’ll notice that when you are inside of a consumer’s timeline, the “MY ACCOUNT” menu contains additional menu items at the top, unique to the consumer.
These menu items allow you to access specific information regarding the consumer and also several functions that allow you to upload documents, request documents, and request escrow disbursements for work completed for the consumer.
Viewing Consumer Progress
You can view all tasks completed by a consumer in their timeline by navigating to the “MY ACCOUNT” dropdown menu, then choosing “Client’s Progress”.
The client’s progress page will list all tasks they have completed as well as tasks they haven’t completed.
TIP: Monitor this page to keep track of all documents that you have already received from the client and what you still need.
Accessing Consumer Files
You can view all of the consumer’s files/documents such as credit reports, IDs, Agreements, etc. in their timeline by going to the “MY ACCOUNT” dropdown menu, then choosing “Client’s Files”.
You can click on any document to view it and download it.
Viewing Consumer Escrow Account
You can view the consumer’s escrow account in their timeline by going to the “MY ACCOUNT” dropdown menu, then choosing “Client’s Escrow”.
Here you can view the amount the consumer has paid into their account, their current balance, how much has been paid to you, and any refunds they have received.
NOTE: The Service Provider or Staff member assigned to the consumer will receive notification letting them know when the consumer has approved an escrow payment and then again once that payment has officially cleared into their escrow.
Viewing Consumer Information
Once a consumer signs your agreement, you will be able to view their personal information, including email address, phone number, etc. This functionality is in place as a legal protective layer – allowing companies to demonstrate a clear avoidance of telemarketing activities.
Once your agreement has been signed by the consumer, you can view it in the timeline by going to “MY ACCOUNT” and then “Client’s Settings”.
Uploading Documents
Service Providers can upload documents to a consumer’s timeline by going to “MY ACCOUNT” and then “Upload Document”.
When uploading a document to the timeline, you will be prompted to identify who the document is for. You can select multiple users. This will allow the system to notify the specific users that a document has been uploaded to the timeline for them to review.
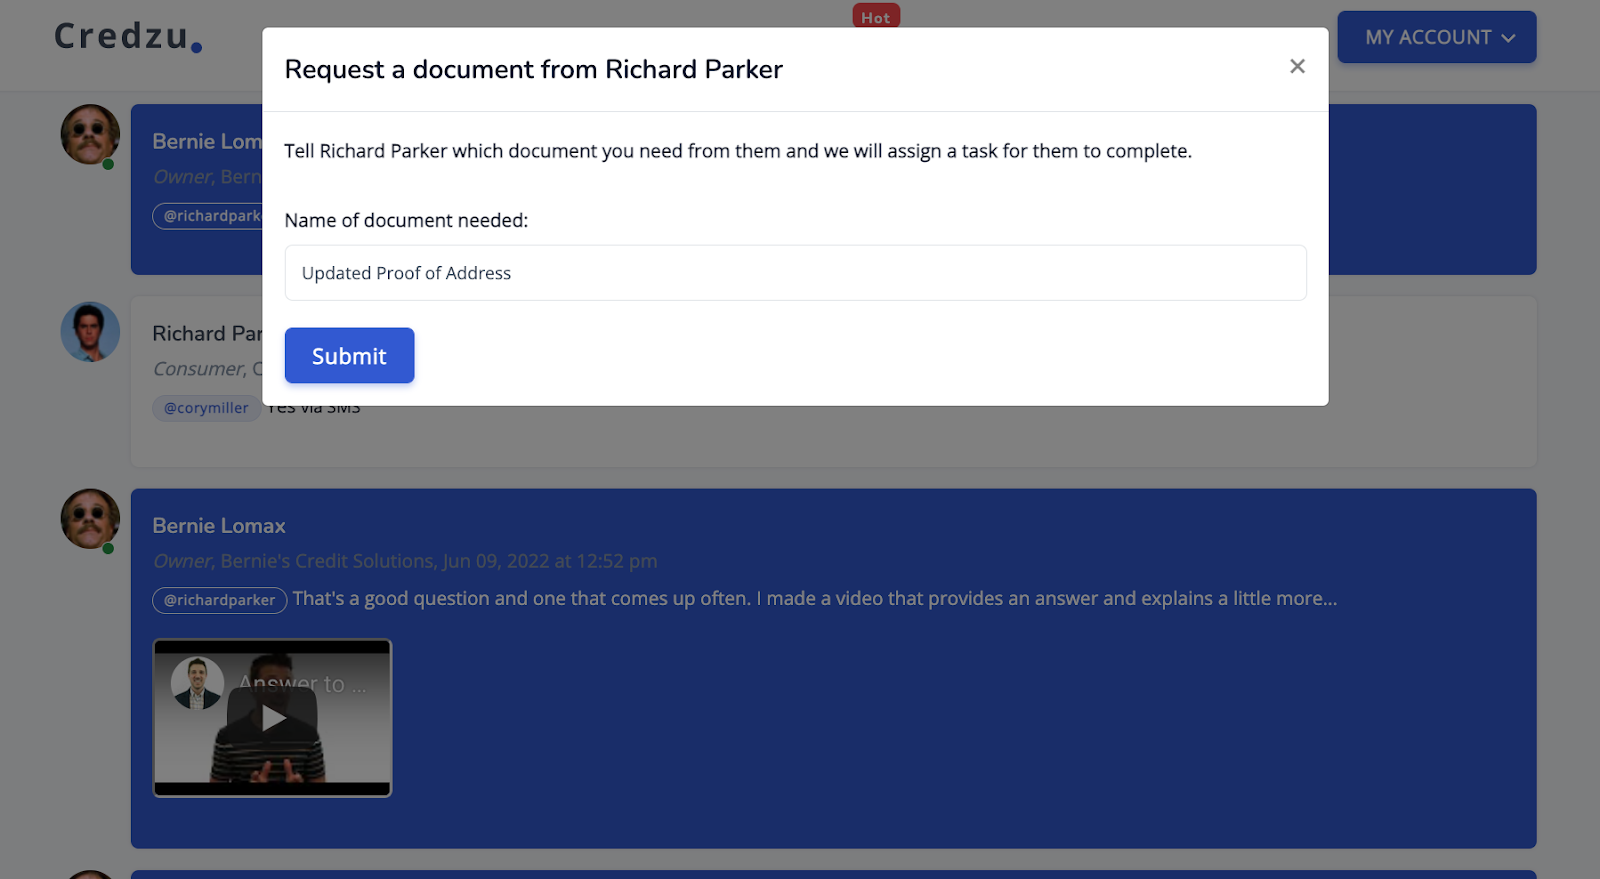
Requesting Documents
Service Providers can request documents from a consumer in their timeline by going to “MY ACCOUNT” and then “Request Document”.
Once submitted, the request will generate a button that the consumer can click and then upload the appropriate document.
Requesting Disbursement
Once work has been performed, Service Providers can request disbursement from the consumer’s escrow account. Keep in mind that funds must be available in escrow in order for a Service Provider to request a disbursement.
To request a disbursement in a consumer’s timeline, go to “MY ACCOUNT” and then choose “Request Disbursement”.
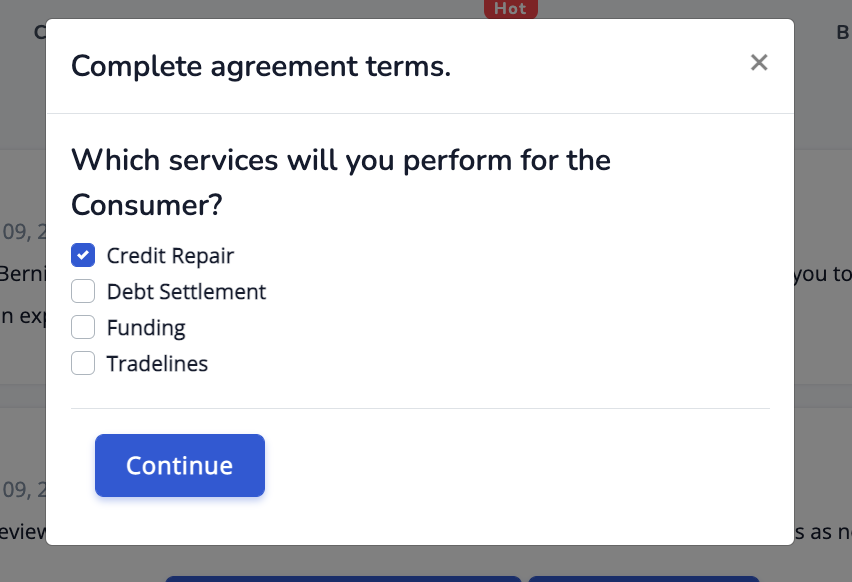
Creating Agreements/Offers
Service Providers can present agreements/offers to consumers by clicking on the “COMPLETE AGREEMENT TERMS” button located at the top of the chat in each timeline. Once the button is selected, a prompt will appear asking for the type of service to be performed.
Creating Agreement Terms
After the type of service has been chosen, the agreement terms will display. By default, all content created in your default agreement (see “MY AGREEMENT TERMS”) will be carried over to each individual client’s agreement; however, it may be changed on a case-by-case basis and you will have the opportunity to do that when you begin creating your agreement. If anything is changed in an individual agreement, it will not be changed in the default agreement. To change the default agreement, choose “MY ACCOUNT” and then “MY AGREEMENT TERMS”.
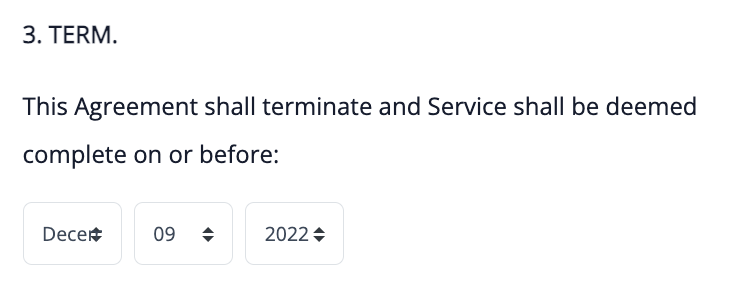
NOTE: There are two fields that must be changed for each client – the term, which identifies the end of services for the individual client:
And the expiration, which specifies when the agreement must be signed:
NOTE: Since each agreement has a specific timeframe and an estimated end date, consumers will need to sign within a certain period of time. Otherwise, for example, if they sign an old agreement months later, the timeframe may no longer make sense.
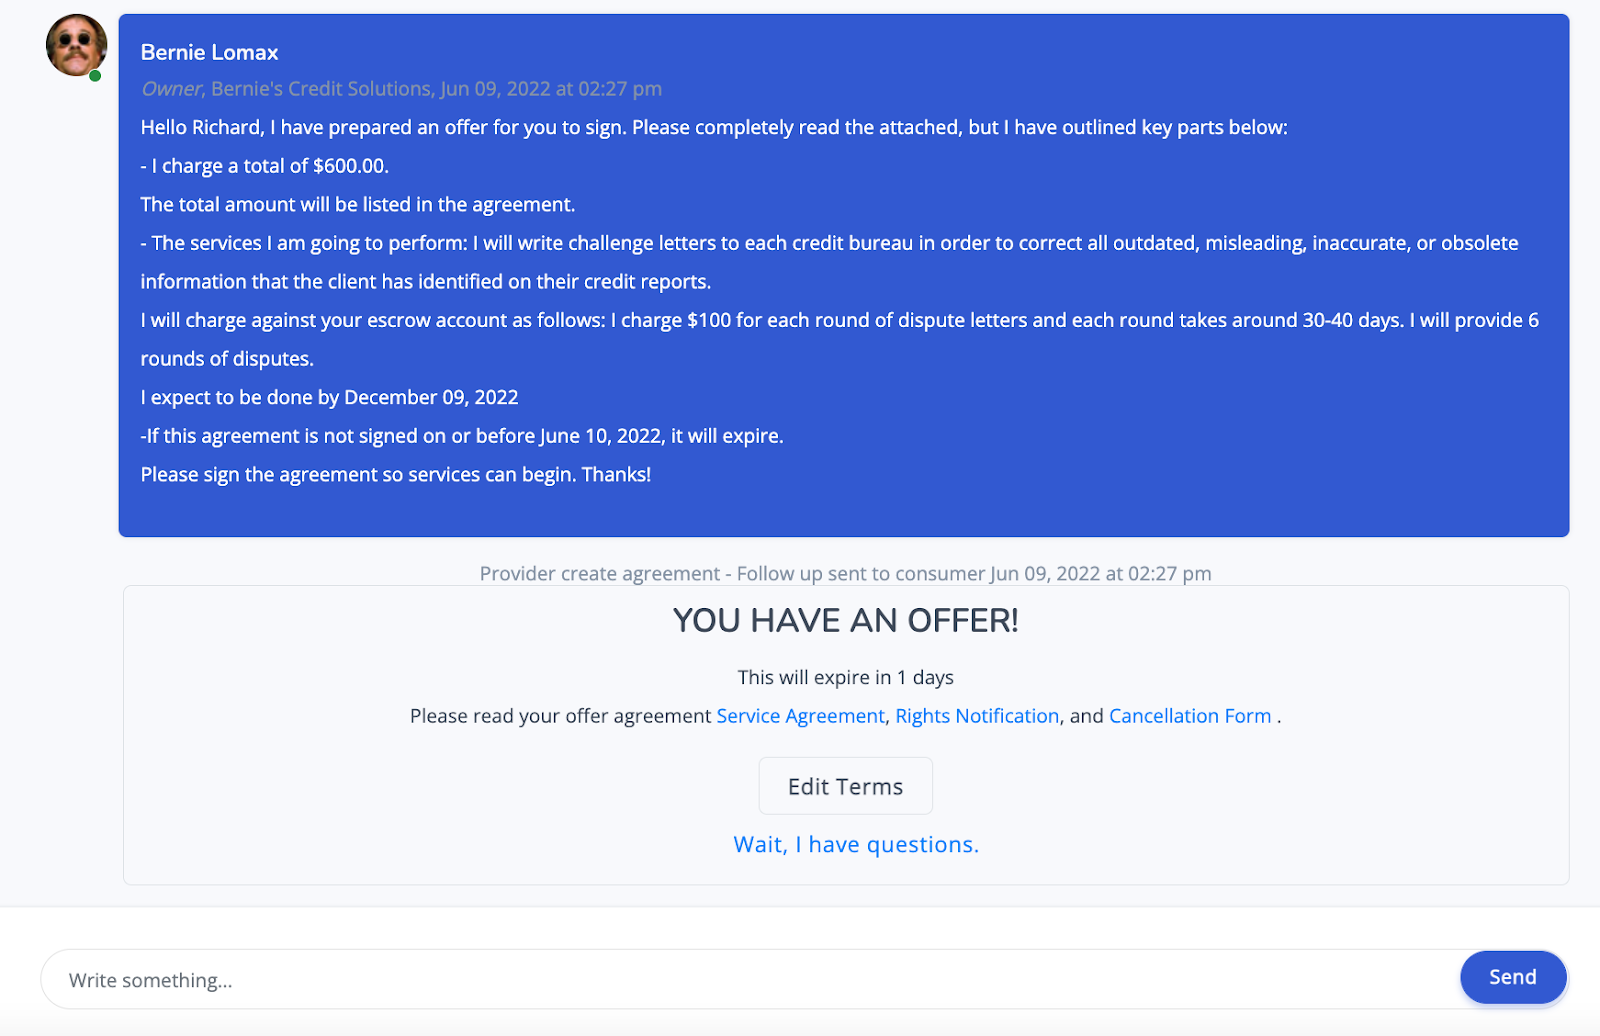
Agreements In The Timeline
Once an agreement has been created by the Service Provider for the individual client, the system will generate an “Offer” for the client to sign. The Consumer and Service Provider will each see something slightly different in their timeline. For example, here is what the Service Provider will see:
The Service Provider can click on “Edit Terms” if the agreement needs to be changed.
NOTE: Due to compliance under the TSR and CROA, agreements may not be changed after they have been signed. If a mistake has been made and the agreement must be changed after the consumer has signed it, please contact your Credzu Rep directly.
Here is what the Consumer will see:
The “YOU HAVE AN OFFER” message will stay pinned to the bottom of the timeline until the consumer signs.
Once the consumer signs the agreement, the Service Provider or Staff Member (whoever is assigned to the consumer) will receive a text message and email notification letting them know the agreement has been signed.
If the consumer clicks on the “Wait, I have questions” link, the system will give them answers to common questions.
If they choose the “I’m not ready” option, it will ask them to identify a period of time in which they will. The system will automatically follow up.
Declining Services
If a Service Provider determines that a client is not a good candidate for credit repair, they can choose to “Decline Services” and communicate with all parties involved in the timeline, the reason. The Decline Services button is located at the top of the timeline, next to the Complete Agreement Terms Button.
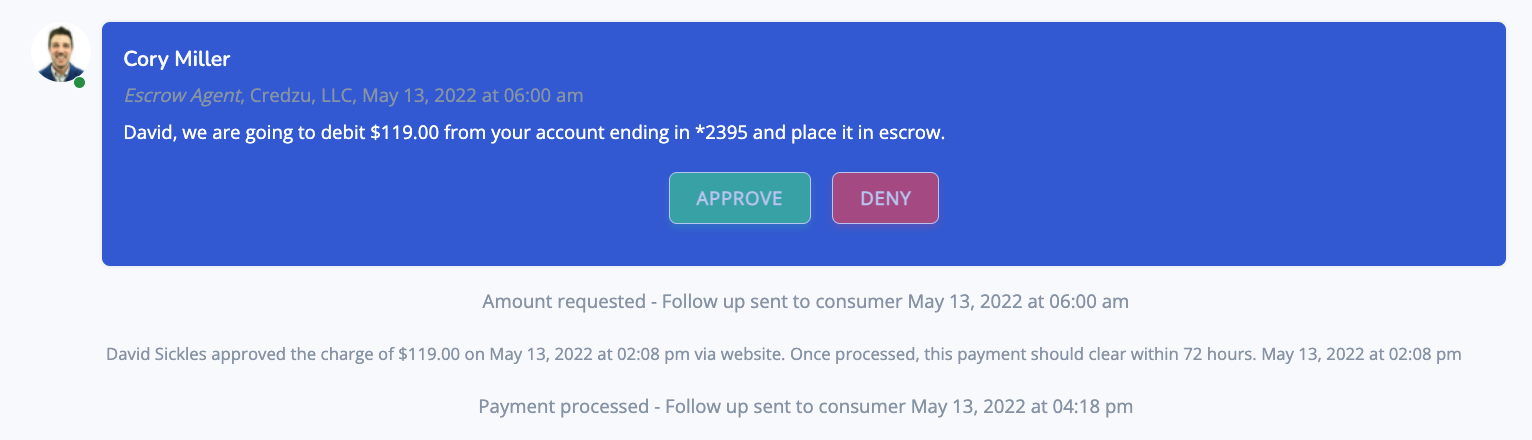
Consumer Escrow Payment Approvals
Service Providers in Credzu should not direct payments. Credzu will handle all payment requests. Payment approval requests will stay pinned to the bottom of the timeline until the consumer approves or denies the payment.
Consumer Signups
When a consumer signs up through your direct signup link or if Credzu connects you with a lead, you (or the staff member assigned to clients) will receive a notification via text and email with their name.
The new client can be located on the dashboard.
Common Tasks (links to sections in this document)
– Adding/changing billing information
– Adding/changing default agreement terms
– Adding/changing staff members
We try to provide great articles. Help us share them.